
Machine Learning on VMware: Training a Model with H2O.ai Tools, Inference using a REST Server and Kubernetes


This blog was originally posted by Justin Murray of VMware and can be accessed here.
In this article, we explore the tools and process for
(1) training a machine learning model on a given dataset using the H2O Driverless AI (DAI) tool, and
(2) deploying a trained model, as part of a scoring pipeline, to a REST server for use by business applications.
All of the infrastructure requirements for this system were handled by VMware vSphere combined with Kubernetes. We used H2O’s Driverless AI tool, as used in previous work on ML training and as also seen in an introduction to the benefits of using H2O with VMware. The H2O DAI tool works very well in virtual machines on vSphere – it enables the machine learning/data scientist user to automate the model choice and tuning parameters that are most appropriate for a given dataset. In our example, once we set up the appropriate experiment parameters, the tool chose the popular LightGBM model to best fit our training data – under our accuracy requirements. For other conditions it may choose an XGBoost model or others. We wanted to deploy the resulting trained model from the DAI tool to a RESTful server, running in containers that are hosted in virtual machines on vSphere and controlled by Kubernetes. Any application using the model, that requires predictions (scoring) to be done, can use a URL or curl command to get to the REST server so that scoring is done in the model and the results returned to them. The consuming application need not know the details of the model deployment or infrastructure.
In an earlier article, we saw an H2O-trained model being deployed to a Java JVM and to an Apache Spark distributed application environment. These are viable methods of training and running a model in production or in testing. We also used multiple versions of the H2O Driverless AI tool running in separate VMs at the same time on a set of vSphere servers – as would be the case for a team of data scientists working on separate problems, perhaps using different versions of the same tool.
Visualizing the Data, Training the Model and Building the Scorer Pipeline
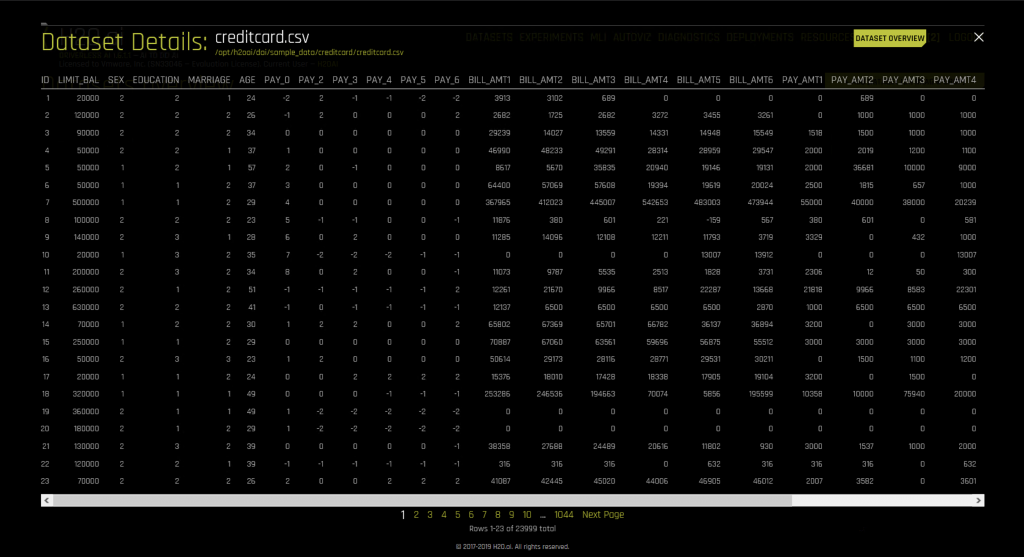
We used the CreditCard example data that was supplied by H2O as a training dataset for the work here. This is data in tabular form that can be viewed in rows and columns just as a spreadsheet or database table would be. We understand that many business users have data like this and that they want to exercise ML prediction or inference on it to serve the business needs. Here is an outline of the structure of the data as seen when it is imported into the DAI tool.
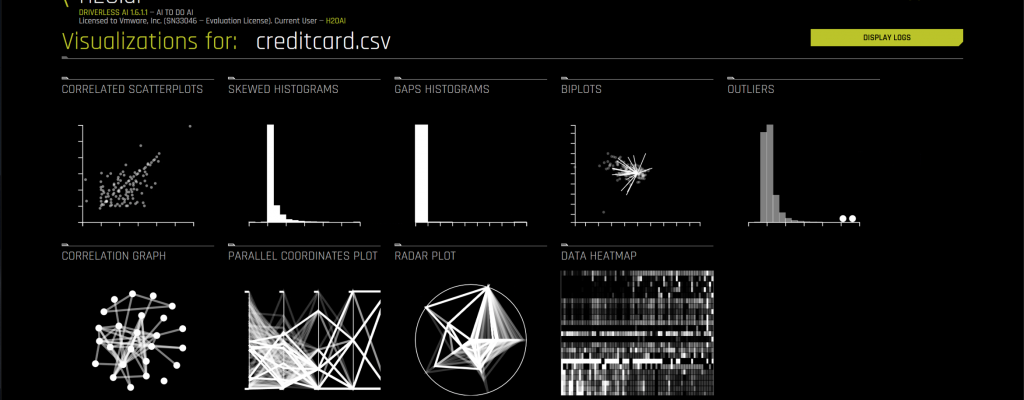
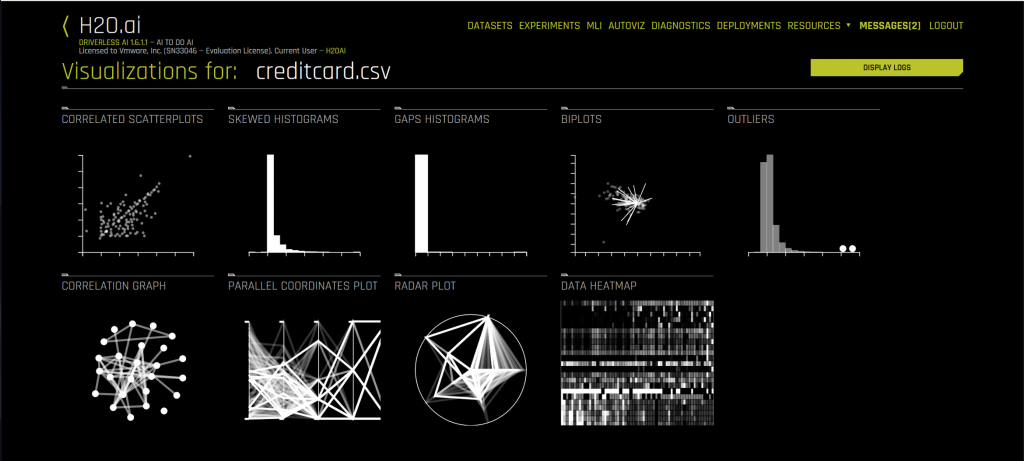
There are multiple types of visualization techniques available in the H2O DAI tool that you can use to get a better feel for the patterns present in your training data. Here is a summary screen of that topic. We do not go into detail on this visualization area here. Consult the H2O documentation for more details on this subject.
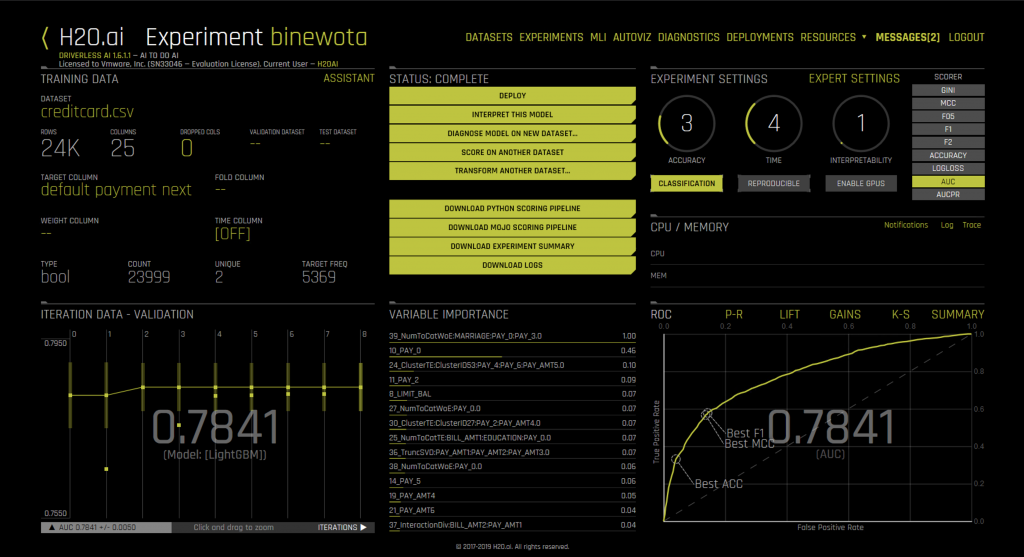
We ran the DAI training process (or “experiment” as it is termed in the tool) on the creditcard.csv dataset. The tool chose to use the LightGBM model as shown under the accuracy number in the bottom left pane. LightGBM is one of the models that are shipped with the DAI tool and it is one of a family of models that use Gradient Boosted Machine algorithms for training a model.
Once the training of the model on the input dataset is done, we want to get the end deliverable, i.e. the trained model, and deploy it for application use. That trained model and its enclosing pipeline is called a model-optimized Java object or “MOJO” in H2O’s terminology. We see that term used in the user interface of the DAI tool. We use the “Build MOJO Scoring Pipeline” menu option in the tool to finish an experiment. The term “Scoring pipeline” here refers to the trained model along with a set of data transformers that were applied to the data, so that the tool can make sense of it. These together make up a “scoring pipeline”. This is all encapsulated into one deployable object, as we will see.
NOTE: Depending on your H2O setup, a DAI configuration option as shown here
DRIVERLESS_AI_MAKE_MOJO_SCORING_PIPELINE=1
will be needed for this “Build MOJO Scoring Pipeline” option to appear in the tool’s user interface. For details on this functionality in the tool, see the instructions for building the MOJO scoring pipeline.
Below we see the H2O Driverless AI tool as it is seen at the end of the model training process and after executing the “Build MOJO Scoring Pipeline” menu option.
Once we execute that option and the scoring pipeline has been built by the tool, we download the pipeline from the DAI tool to our local VM using the menu item “Download MOJO Scoring Pipeline” from the menu above. The MOJO file downloads as a Zip file as seen below.
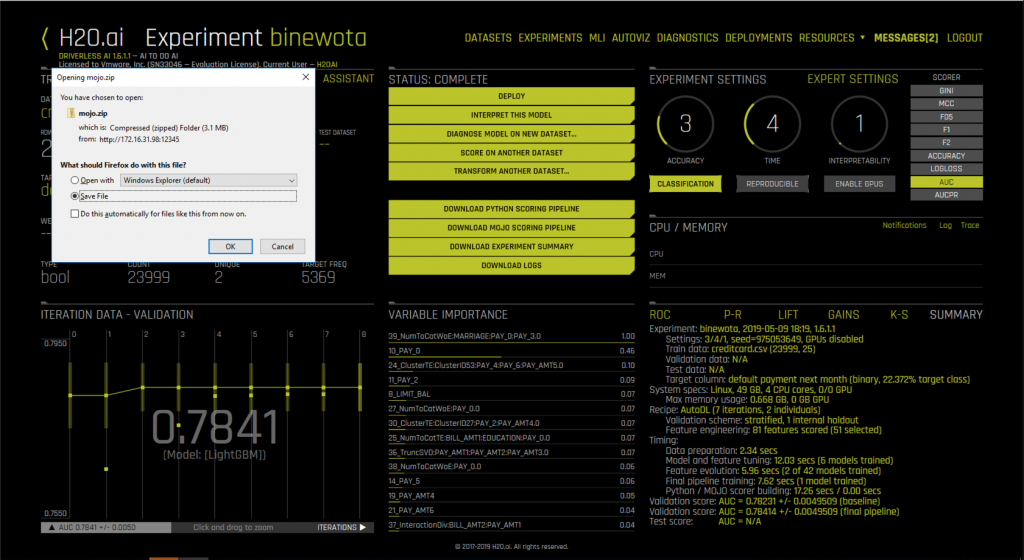
Once we unzip that downloaded “mojo.zip” file, this is what those contents look like. These are seen in the file explorer on a Windows-based VM where our Firefox browser was running, to access the H2O DAI user interface.
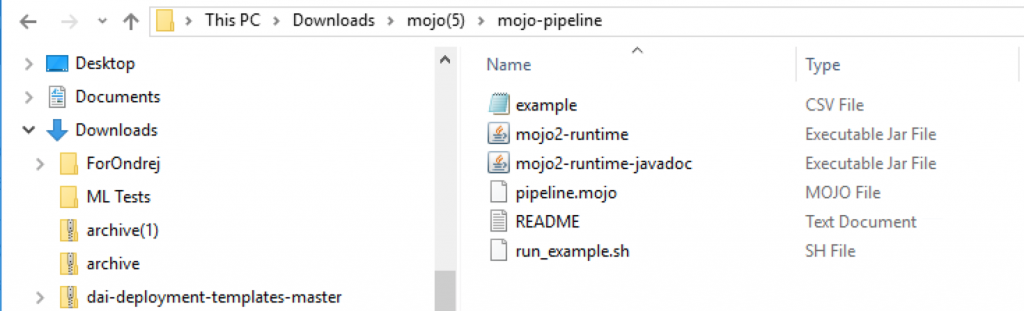
The ML pipeline is contained in a file called “pipeline.mojo” from the mojo.pipeline directory within the zip file. That “pipeline.mojo” captures the trained model from our earlier training work in DAI and will allow us to execute the inference logic. It contains some man-readable and some binary data.
This is the same final model product file from the DAI tool that was deployed to the Java runtime and to standalone Apache Spark in the earlier article
Using the H2O Runtime Libraries to Run the Scorer Pipeline on a RESTful Server
We used a library from H2O that supports the execution of the ML pipeline on a REST server. We get these libraries by downloading the latest version of the DAI deployment templates available here
ASIDE: This downloadable file contains the same product that one would get by using the “build” method that is described here
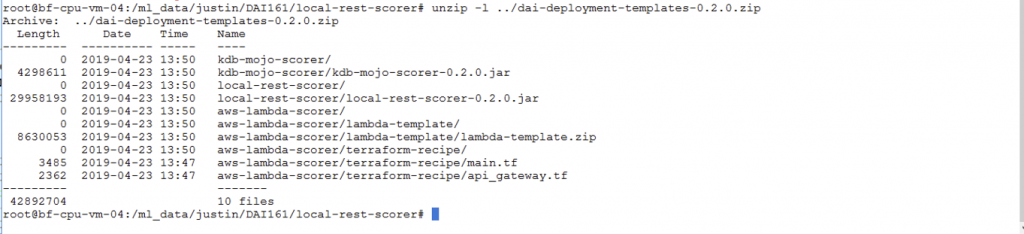
We extracted the contents of the “dai-deployment-templates-0.2.0.zip” file above to produce three directories, one of which is relevant to the current work, namely the “local-rest-scorer-0.2.0.jar” file. This file contains libraries for running the SpringBoot, Swagger, Tomcat and other components that help to execute a MOJO on a REST server platform. Here is how the structure looked of that set of classes within the dai-deployment-templates-0.2.0.zip file.
The Java JDK version 1.8.0 was used for executing the RESTful scorer in this work, so as to achieve compatibility with some JAXB APIs that are present in the H2O template libraries. We used the OpenJDK 1.8.0 version.
The outline of the command we used to start up a RESTful server using the MOJO as the executable model within a VM was:
$ java –Dmojo.path={PATH_TO_MOJO_PIPELINE} –jar build/libs/local–rest–scorer–{YOUR_CURRENT_VERSION}.jar
This step is described here
To execute the command, we needed the Driverless AI license file location to be specified on the command line as follows:
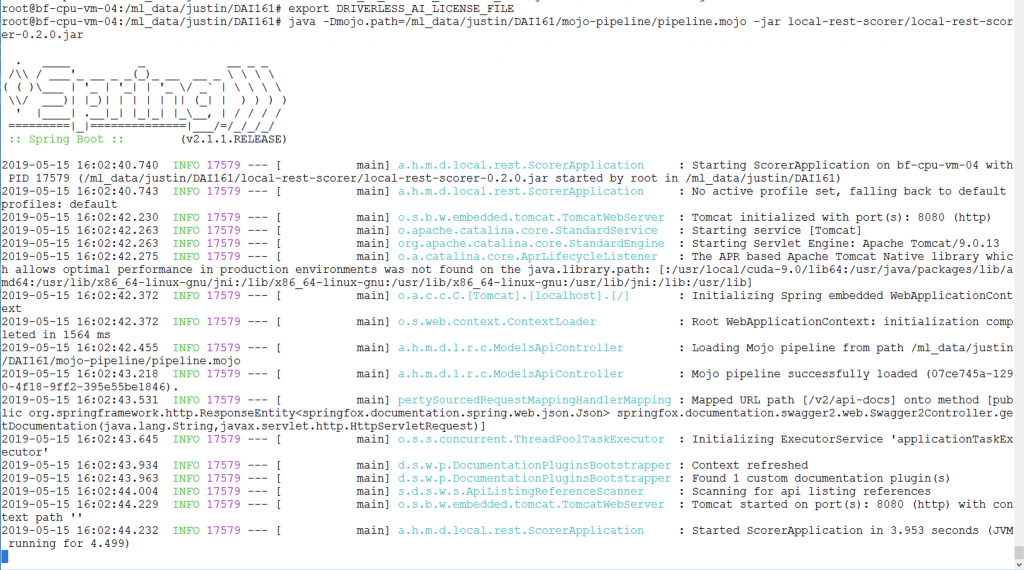
$ java –Dmojo.path=/pipeline.mojo –Dai.h2o.mojos.runtime.license.file=/license.sig –jar /local–rest–scorer–0.2.0.jar
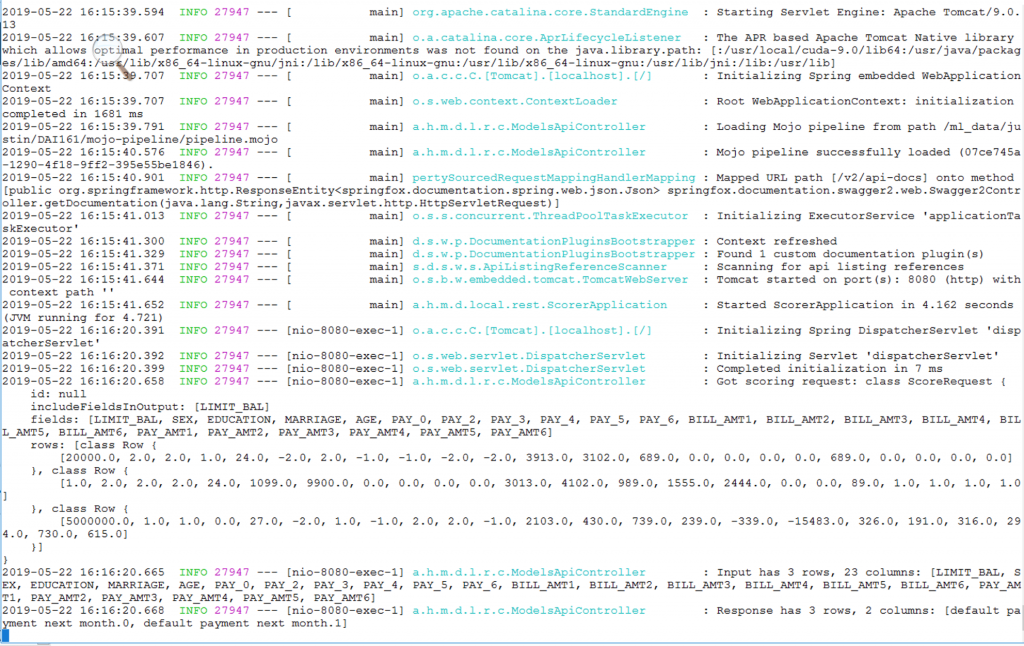
Here is the output from that command as seen in the guest operating system of a Linux virtual machine running on vSphere. Note that this VM, as with all VMs used in this work, is a CPU-only one, and does not have an associated GPU. We set the DAI license as an environment variable in this particular run of the REST server, as you see on the first line below.
Invoking the Scorer with Test Data
The command issued in a separate VM, to invoke the deployed scorer pipeline, to get inference done was:
$ curl –X POST –H “Content-Type: application/json” –d @test.json <a href=“http://172.16.31.98:8080/models/07ce745a-1290-4f18-9ff2-395e55be1846/score”>http://172.16.31.98:8080/models/07ce745a-1290-4f18-9ff2-395e55be1846/score</a>
where the string of hex characters after the “models” component represents the UUID of the deployed scorer. You can get the UUID of the loaded pipeline by calling the following:
$ curl http://localhost:8080/model
The input data used by the model for scoring is in the “test.json” file passed with the command. If this input were a large quantity of data, it could be transferred to the REST server side first and then a GET equivalent CURL command used to process it through the server. Inference commands of this nature could be issued by several consumers of the scorer service, from many client virtual machines and applications.
The bottom 20 lines of the output from the REST-based model server, seen below, show the logging of incoming requests to do inference/prediction of a credit card default on some test data.
Placing the ML Pipeline into a Container Managed by Kubernetes
An ML model, or scoring pipeline, as shown above, is a good example of a stateless server, so that it fits well with the container approach for deployment. A model does have some state, composed of the set of coefficients that make up the model’s parameters and the data transformations that it needs to do on incoming data, but this is easily encapsulated in a single process as we will see. That process is independent of the test data that will be given by consuming programs or client applications to make predictions on.
The work below was done on a virtual machine that was setup earlier to be a Kubernetes client, using the Enterprise PKS technology from VMware. Examples of the sets of supporting VMs for two separate clusters that are created by Enterprise PKS to run a Kubernetes cluster are shown here.
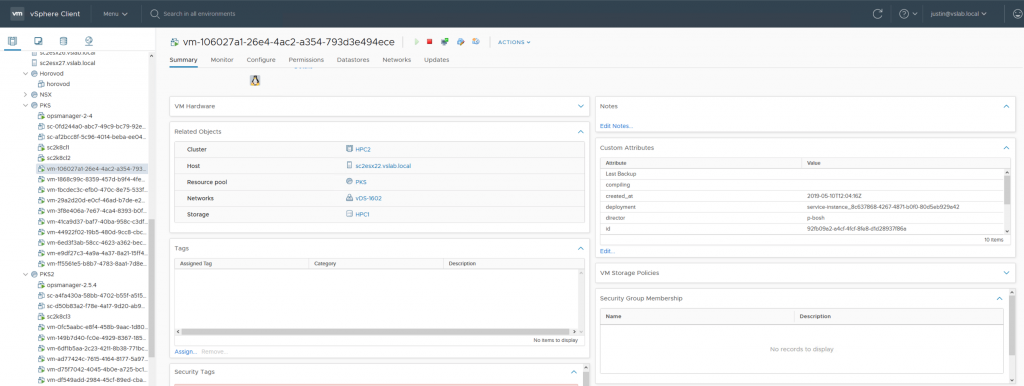
We accessed the Kubernetes cluster using the Kubernetes client VM (from Enterprise PKS) named “sc2k8cl1″” as seen above. These virtual machines allowed us to use the Kubernetes dashboard and the various Docker and kubectl commands below.
We first created a “dockerfile” to describe the image we want, and copied the appropriate ML-specific files into that image that were needed. The contents of the dockerfile are shown here.
FROM openjdk:8
# copy MOJO, DAI1.6.1 license and Scorer class files into image
COPY pipeline.mojo /pipeline.mojo
COPY license.sig /license.sig
COPY local–rest–scorer–0.2.0.jar /local–rest–scorer–0.2.0.jar
# run application with this command line
CMD [“/usr/bin/java”, “-Dmojo.path=/pipeline.mojo”,“-Dai.h2o.mojos.runtime.license.file=/license.sig”, “-jar”, “/local-rest-scorer-0.2.0.jar”]
We use the Docker and Kubernetes commands described below to
- create the Docker image,
- tag it with a repository name, image name and label, and
- push it to the DockerHub repository, where we had an account already created
- deploy the image from DockerHub under Kubernetes’ control
First, we create the container image for use with Docker and Kubernetes
$ docker image build –f dockerfile.
The command above, if successful, returns the image ID of the generated image, in our case “d5d8d8cc2997”. We then tag that image as follows:
$ docker tag d5d8d8cc2997 justinmurray/scorer:lates
And subsequently push the tagged image to the Dockerhub repository
$ docker push justinmurray/scorer:lates
At this point, we were able to test the scorer pipeline in a container, by mapping the container port to a host port and running the container under Docker control
$ docker run –p 8080:8080 justinmurray/scorer:lates
In order to deploy the container for the scorer pipeline under Kubernetes control, we used a YAML file as show below
# Deploy this project using the command below:
# kubectl apply -f scorer.yaml
apiVersion: extensions/v1beta1
kind: Deployment
metadata:
name: scorer
spec:
replicas: 2
template:
metadata:
labels:
app: scorer
spec:
containers:
– name: scorer
<strong>image: justinmurray/scorer:latest</strong>
ports:
– containerPort: 808
The YAML instructions above were placed in a file called scorer.yaml that was then used to place the scorer pipeline server under Kubernetes control using the command
$ kubectl apply –f scorer.yam
In order to expose the deployment of the scorer pipeline to the world outside of the Kubernetes cluster, we used a NodePort service feature in Kubernetes to map an external port to the container port as shown in the NodePort. yaml file below. We also tested a Kubernetes LoadBalancer service here to front-end the scorer pipeline, but will omit the details of that here.
apiVersion: v1
kind: Service
metadata:
name: scorer–nodeport
labels:
name: scorer
spec:
type: NodePort
ports:
– protocol: “TCP”
port: 8080
<strong>targetPort: 8080</strong>
name: http
selector:
app: scorer
$ kubectl apply –f NodePort.yam
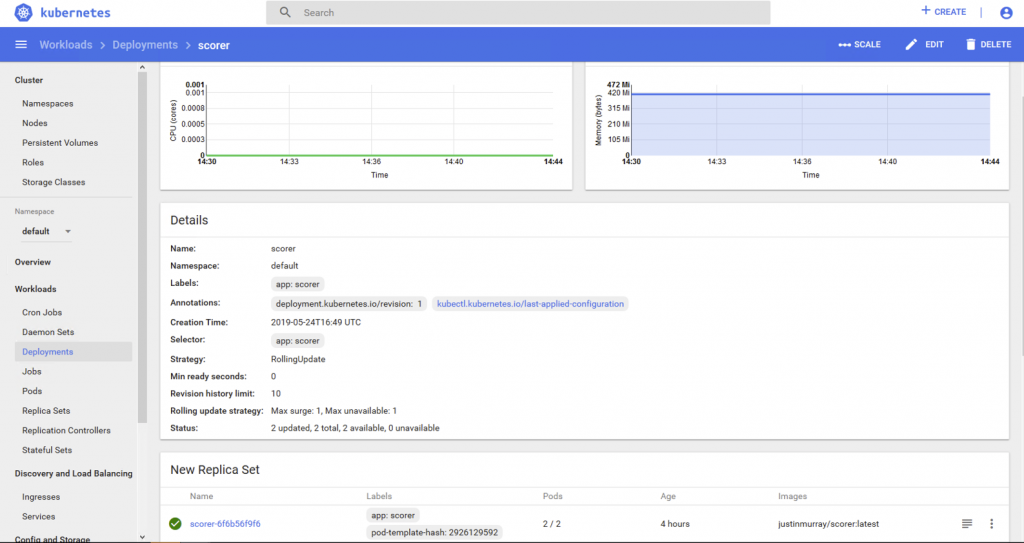
Once these two items were deployed, the scorer deployment can then be seen in the Kubernetes dashboard as shown here.
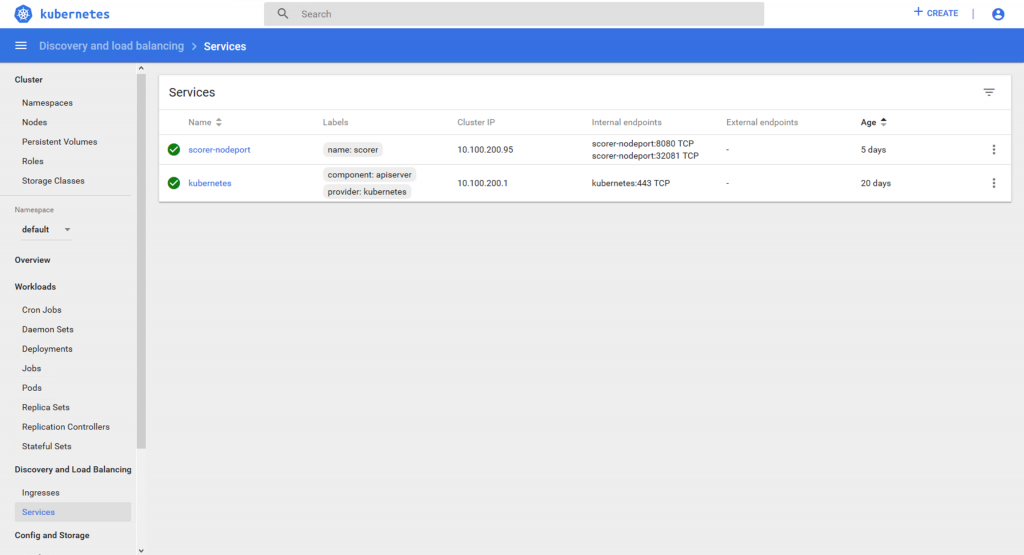
The NodePort service which allows us to use an external port to get access to a server on one or more of our Kubernetes nodes is seen in the Services section of the dashboard here
Our scorer pipeline has two replicas running, (as specified in the Scorer.yaml) one on each of the two pods as seen below.
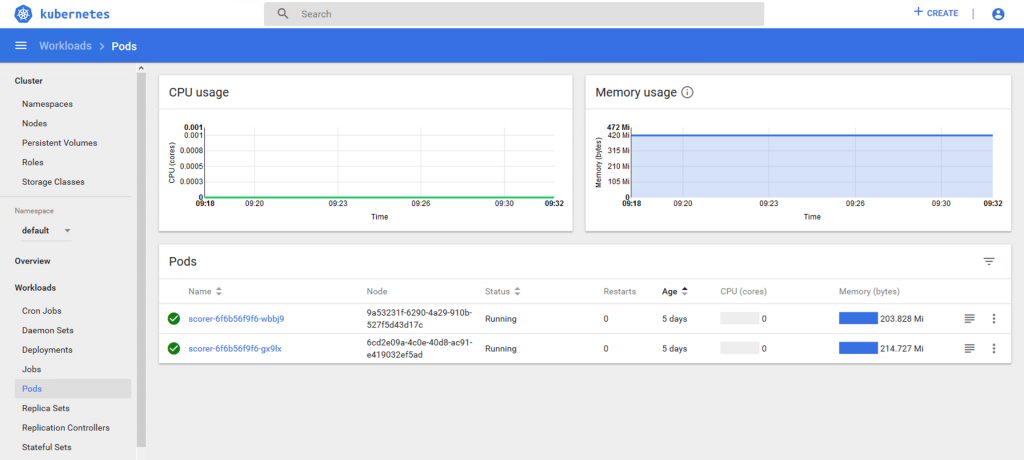
The Kubernetes pods live on two different Kubernetes nodes that themselves are mapped to VMs in our particular Enterprise PKS implementation.
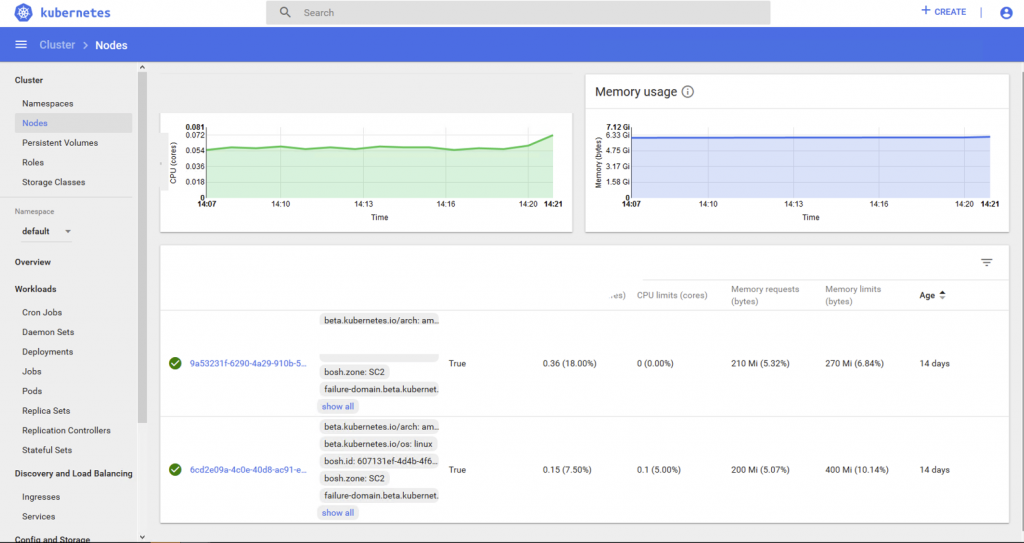
We can get more details on the Kubernetes objects (such as the external IP addresses for the Kubernetes nodes) by using the command line tool “kubectl” with the options below. First we look as the deployed services, one of which is our NodePort service, that presents the container port 8080 to the outside world as a controlled port 32081. We will use that external port on the command line when we access the scorer itself.
$ kubectl get svc
NAME TYPE CLUSTER–IP EXTERNAL–IP PORT(S) AGE
kubernetes ClusterIP 10.100.200.1 <none> 443/TCP 21d
scorer–nodeport NodePort 10.100.200.95 <none> 8080:32081/TCP 7d
To see the various deployments under Kubernetes’ control we use the command
$ kubectl get deployments
NAME DESIRED CURRENT UP–TO–DATE AVAILABLE AGE
scorer 2 2 2 2 7d
To get the nodes’ IP external addresses, we use the command
$ kubectl get nodes –o wide
NAME STATUS ROLES AGE VERSION INTERNAL–IP EXTERNAL–IP OS–IMAGE KERNEL–VERSION CONTAINER–RUNTIME
6cd2e09a–4c0e–40d8–ac91–e419032ef5ad Ready <none> 27d v1.11.6 172.16.2.12 172.16.2.12 Ubuntu 16.04.5 LTS 4.15.0–43–generic docker://17.12.1-ce
9a53231f–6290–4a29–910b–527f5d43d17c Ready <none> 27d v1.11.6 172.16.2.13 172.16.2.13 Ubuntu 16.04.5 LTS 4.15.0–43–generic docker://17.12.1-c
Using the Scorer Pipeline
To test the scorer that is now managed by Kubernetes, we used a command within a shell script (named “run3a”) that is very similar to the ones used earlier as follows:
$ cat run3a
curl –X POST –H “Content-Type: application/json” –d @test.json http://172.16.2.12:32081/models/07ce745a-1290-4f18-9ff2-395e55be1846/score
$ ./run3a
{“id”:“07ce745a-1290-4f18-9ff2-395e55be1846”,“score”:[[“20000”,“0.5937021084702012”,“0.4062978915297988”],[“10”,“0.6838225956856044”,“0.31617740431439556”]}
The scorer’s output from this test (above) shows two sets of balances combined with two probability values, for those two input records. The first value in each record output is the current outstanding balance, the second is the probability of a “no default” condition and the third value is the probability of a “default on next payment” condition for that same record of input.
Summary
In this article we see the training of a machine learning model using the powerful features of the H2O Driverless AI tool. Subsequently, we see the deployment of that trained scorer pipeline onto a RESTful server using H2O runtime libraries, the containerization of that RESTful service and finally the placing of that RESTful container under Kubernetes management. This was all done on a set of virtual machines on VMware vSphere servers with no special functionality in them and the whole process can work on all vSphere environments, including VMware Cloud on AWS.
References
- Running common Machine Learning Use Cases on vSphere leveraging NVIDIA GPU
Deploying a Machine Learning Model into Production on VMware with H2O, Apache Spark and GPUs
- Applying Machine Learning Algorithms to Streaming IoT Data on VMware Cloud on AWS and vSphere
- Using GPUs with Virtual Machines on vSphere – Part 1: Overview