Today, we are introducing a walkthrough on how to deploy H2O 3 on Kubeflow. Kubeflow is an open source project led by Google that sits on top of the Kubernetes engine. It is designed to alleviate some of the more tedious tasks associated with machine learning. Kubeflow helps orchestrate deployment of apps through the full cycle of development, testing, and production, while allowing for resource scaling as demand increases. H2O 3’s goal is to reduce the time spent by data scientists on time-consuming tasks like designing grid search algorithms and tuning hyperparameters, while also providing an interface that allows newer practitioners an easy foothold into the machine learning space. The integration of H2O and Kubeflow is extremely powerful, as it provides a turn-key solution for easily deployable and highly scalable machine learning applications, with minimal input required from the user.
Getting Started:
-
- Make sure to have kubectl and ksonnet installed on the machine you are using, as we will need both. Kubectl is the Kubernetes command line tool, and ksonnet is an additional command line tool that assists in managing more complex deployments. Ksonnet helps to generate Kubernetes manifests from templates that may contain several parameters and components.
- Launch a Kubernetes cluster. This can either be an on-prem deployment of Kubernetes or an on-cloud cluster from Google Kubernetes Engine. Minikube offers a platform for local testing and development running as a virtual machine on your laptop.
- Make sure to configure kubectl to work with the your Kubernetes cluster.
a. kubectl cluster-info, will tell you which cluster kubectl is configured to work on at the moment.
b. Google Kubernetes Engine has a link in the GCP console that will provide the command for properly configuring kubectl.
![]()
c. minikube start, will launch minikube and should automatically configure kubectl. You can check this by running the command: “minikube status” after launching minikube to verify.

4. Now we are ready to start our deployment. To begin with, we will initialize a ksonnet application by running the command “ks init <your_app_name>”.
5. Move into the directory that was created by the previous command using “cd <my_app_name>”. You will see that it has been populated with a couple directories, as well as, files containing some default parameters. You do not need to touch these.
6. In order to install the Kubeflow components, we add a ksonnet registry to application. This can be done by running the commands:
ks registry add kubeflow <location_of_the_registry>
ks pkg install kubeflow/core
ks pkg install kubeflow/tf-serving
ks pkg install kubeflow/tf-job
ks pkg install kubeflow/h2o3
a. This will create a registry called “kubeflow” within the ksonnet application using the components found within the specified location.
b. <location_of_the_registry> is typically a github repo. For this walkthrough, you can use this repo as it has the prebuilt components for both H2O and Kubeflow.
c. ks pkg install <component_name> will install the components that we will reference when deploying Kubeflow and H2O.

7. Let’s start with deploying the core Kubeflow components first:
NAMESPACE=kubeflow
kubectl create namespace ${NAMESPACE}
ks generate core kubeflow-core ––name=kubeflow-core ––namespace=${NAMESPACE}
ks env add cloud
ks param set kubeflow-core cloud gke ––env=cloud
KF_ENV=cloud
ks apply ${KF_ENV} -c kubeflow-core
a. These commands will create a deployment of the core Kubeflow components.
b. Note: if you are using minikube, you may want to create an environment named “local” or “minikube” rather than “cloud”, and you can skip the “ks param set …” command.
c. For GKE: you may need to run this command “kubectl create clusterrolebinding default-admin ––clusterrole=cluster-admin ––user=your-user@email.com” to avoid RBAC permission errors.
8. Kubeflow is now deployed on our Kubernetes cluster. There are two options for deploying H2O on Kubeflow: through Kubeflow’s JupyterHub Notebook offering, or as a persistent server. Both options accept a docker image containing the necessary packages for running H2O.
a. You can find the dockerfiles needed for both options here .
b. Copy the dockerfiles to a local directory and run the command “docker build -t <name_for_docker_image> -f <name_of_dockerfile>”.
c. If we are deploying to the cloud, it is a good idea to push the image to a docker container registry like docker hub or google container registry.
Deploy JupyterHub Notebook:
1. The JupyterHub serve comes deployed with the core Kubeflow components. Running the command “kubectl get svc -n=${NAMESPACE}” will show us a service running with the name “tf-hub-0”.

2. Use the command: “kubectl port-forward tf-hub-0 8000:8000 ––namespace={$NAMESPACE}” to make the exposed port available to your local machine, and open http://127.0.0.1:8000 in your browser. Create a username and password when prompted within the browser window, and click “Start My Server”.
3. You will be prompted to designate a docker image to pull, as well as, requests for CPUs, memory, and additional resources. Fill in the resource requests as preferred.
Note: We already have the notebook image (“h2o3-kf-notebook:v1”) pushed to GCR. You will want to build your own image using the dockerfiles provided, and push them to GCR. The notebook image is fairly large, it may take some time to download and start.

4. Once the notebook server has properly spawned, you will see the familiar Jupyter Notebook homepage. Create a new Python 3 notebook. The image built from the dockerfiles provided will have all the requisite plugins to run H2O.
5. A basic example of running H2O AutoML would look something like the images below. A sample of the Jupyter Notebook is available in the repo, or you can follow the example from the H2O AutoML documentation :


Deploy H2O 3 Persistent Server:
1. If we want to deploy H2O 3 as a persistent server, we use the prototype available within the ksonnet registry.
Run the command:
ks prototype use io.ksonnet.pkg.h2o3 h2o3 \
––name h2o3 \
––namespace kubeflow \
––model_server_image <image_name_in_container_registry>
This will create the necessary component for deploying H2O 3 as a persistent server.
2. Finally, deploy the H2O 3 component to the server using this command:
ks apply cloud -c h2o3 -n kubeflow
a. Flag -c specifies the component you wish to deploy and -n flag specifies that we deploy the component to the kubeflow namespace
3. Use “kubectl get deployments” to make sure that the H2O 3 persistent server was deployed properly. “kubectl get pods” will show the name of the pod to which the server was deployed.

4. Additionally, if running “kubectl get svc -n kubeflow” you will see a service named “h2o3” running with type “LoadBalancer”. If you wait about a minute, the external-ip will change from <pending> to a real ip address.
5. Go to a working directory where you would like to store any Jupyter Notebooks or scripts. At this point you can launch a Jupyter Notebook locally or write a python script the runs H2O. Make sure your local version of H2O 3 is up to date. You can follow the steps here to install the newest version of H2O 3. By default, docker will build the image using the most current version of H2O 3.
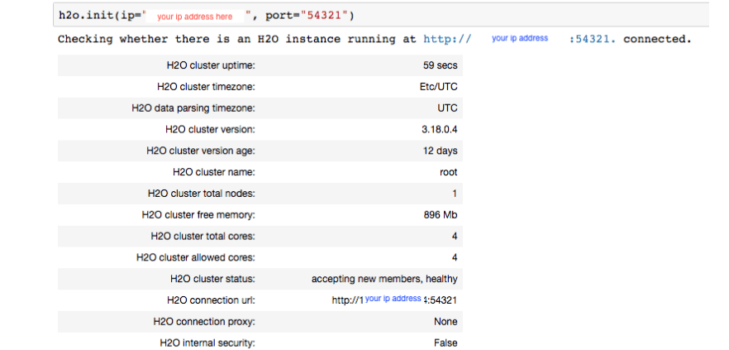
a. Use the External IP address obtained from “kubectl get svc -n kubeflow” and the port 54321 in the h2o.init() command, and you will connect H2O to the cluster running in kubernetes.

b. From here, the steps are the same as in the JupyterHub Notebook above. You can follow the same example steps as are outlined in the AutoML example here.
6. Optionally, you can direct your browser to the exposed ip address with http://<your_ip>:54321. This will launch H2O Flow, which is H2O’s web server offering. H2O Flow provides a notebook like UI with more point and click options as compared to a Jupyter Notebook which requires understanding of Python syntax.

This walkthrough provides a small window into a high-potential, ongoing project. Currently, the deployment of H2O.ai’s enterprise product Driverless AI on Kubeflow is in progress. At the moment, it is deployable in a similar fashion to the H2O 3 persistent server, and beta work on this can be found within the github repo . Driverless AI speeds up data science workflows by automating feature engineering , model tuning, ensembling, and model deployment.
Please feel free to contact me with any questions via email or Linkedin .
All files are available here: https://github.com/h2oai/h2o-kubeflow .


